10 Easy Updos for Thin Hair Ideas

Introduction
Updos for thin hair offer a perfect combination of style and practicality. While thin hair can sometimes feel difficult to manage, these hairstyles provide volume, elegance, and versatility. Learning to create flattering updos allows individuals to elevate their everyday look, whether for work, casual outings, or special events. This article provides a collection of ten easy updos designed specifically for thin hair, ensuring both style and practicality. Readers will gain insights into various updo types, step-by-step tutorials, and preparation techniques tailored to maximize volume and maintain a polished finish. These updos are particularly beneficial for those seeking low-maintenance styles that require minimal heat or heavy product use, making them gentle on fine hair strands.
By exploring these ideas, readers will understand how to create hairstyles that appear fuller and more textured, enhancing both confidence and overall appearance. Each updo is beginner friendly, designed to accommodate thin hair without extensive styling skills. Beyond aesthetics, these updos provide a functional solution for keeping hair secure throughout the day. Readers will also learn practical tips, common mistakes to avoid, and ways to personalize each style. This article serves as a comprehensive guide for transforming thin hair into beautiful, creative, and modern updos with minimal effort.
Why This Idea Is Trending or Useful
The popularity of easy updos for thin hair stems from their practicality, adaptability, and visual appeal. On Pinterest, these hairstyles frequently appear in trending boards for home decor-inspired fashion, DIY hair tutorials, and modern minimalist style inspiration. Thin hair can often appear flat or lack volume, which makes updos a strategic solution for creating fullness without extensions. These styles are versatile, working for casual days, professional settings, and elegant occasions alike. Many Pinterest users are drawn to these looks because they offer a combination of aesthetic appeal and functional design.
Additionally, thin hair updos have a strong DIY appeal. With step-by-step instructions and minimal materials—such as hairpins, elastics, and basic styling tools—any beginner can recreate these looks at home. They require little preparation while delivering a polished, handmade finish. From a planning perspective, these hairstyles fit seamlessly into modern lifestyles that value efficiency and easy projects. By leveraging small techniques such as teasing, curling, or strategically pinning, thin hair can appear voluminous and textured. The accessibility and beginner friendliness of these updos make them ideal for Pinterest inspiration boards, appealing to individuals seeking creative yet practical hairstyling ideas.
Materials and Preparation
Before creating updos for thin hair, preparation is essential to achieve a full and lasting result. Materials for these hairstyles generally include hair elastics, bobby pins, hair clips, combs, brushes, and optionally lightweight volumizing products or texturizing sprays. Preparing thin hair with appropriate products can create grip and texture, preventing the hairstyle from slipping and adding the appearance of density. Choosing tools that do not pull or damage delicate strands is crucial, as thin hair is more prone to breakage. A soft-bristle brush or detangling comb ensures smooth handling without causing unnecessary stress to hair strands.
Preparation also involves planning the style based on hair length and texture. Sectioning hair in advance helps create structured designs and reduces mistakes during styling. For some updos, curling or slight wave creation can enhance volume, while teasing sections strategically can provide lift at the crown. Consideration of accessories, such as decorative pins or hairbands, can enhance the overall aesthetic and offer finishing touches. Time planning is another factor; allowing adequate time to practice each step ensures precision and improves the final outcome. Proper preparation and materials directly contribute to successful execution, making thin hair updos more manageable and visually appealing.
Idea 1: Voluminous Low Bun
How to Create
The voluminous low bun is a timeless and elegant hairstyle suitable for thin hair. It creates the illusion of fullness by strategically placing hair in a low, rounded bun at the nape of the neck. The style emphasizes texture and movement, ensuring thin hair does not appear flat. Variations can include a smooth finish for formal occasions or a slightly tousled bun for casual, creative projects. Adding subtle twists or braids along the sides increases visual interest and enhances the modern design appeal. This hairstyle is versatile and adapts well to different hair lengths, making it an ideal beginner friendly updo.
To create the voluminous low bun, start by brushing hair to remove tangles and apply lightweight texturizing spray for grip. Gather hair at the nape and divide it into two sections. Slightly tease the lower section for added volume, then twist it into a bun and secure with bobby pins. Wrap the top section around the bun, tucking ends neatly underneath and pinning securely. Optional decorative pins can add a polished handmade touch. Adjust the bun shape to ensure symmetry and fullness, and lightly pull strands at the crown to enhance volume further. This step-by-step process allows thin hair to appear thicker while maintaining a secure and stylish finish.

Idea 2: Twisted Half-Up Updo
How to Create
The twisted half-up updo offers a balance between casual elegance and volume enhancement. By leaving the bottom half of hair loose, this style adds movement while drawing attention to the twisted details at the top. Twisting sections creates a three-dimensional effect, which is particularly beneficial for thin hair. This look complements both professional settings and creative projects inspired by Pinterest aesthetics. Incorporating small braids or multiple twists can further enhance the aesthetic and provide a more intricate appearance while keeping the hairstyle beginner friendly.
To achieve this style, section off the top half of hair from temple to crown. Divide it into two equal parts and twist each section toward the back of the head, securing them with bobby pins or a small elastic. Gently tug at the twists to create volume and softness. Optionally, curl the remaining hair at the bottom to add texture and complement the twisted upper portion. This method allows for precise planning and ensures a secure structure for thin hair. The step-by-step creation is straightforward, requiring only basic tools and minimal preparation while achieving an aesthetically pleasing handmade finish suitable for DIY enthusiasts.

Idea 3: Messy Braided Bun
How to Create
A messy braided bun combines texture and volume, making it ideal for thin hair that requires visual fullness. The design integrates a loosely braided section into a casual bun, creating a soft, romantic effect. The braid adds dimension, while the messiness ensures the hairstyle appears naturally voluminous. This style is highly versatile, fitting modern minimalist style inspiration, casual occasions, or creative projects displayed on Pinterest boards. The approach emphasizes aesthetic appeal without heavy reliance on product, making it beginner friendly and practical for daily use.
Start by dividing hair into two sections. Create a loose braid on one side, gently pulling strands to add texture. Gather all hair, including the braid, into a low ponytail. Twist the ponytail into a bun and secure with bobby pins. Adjust the braid’s position around the bun to maximize visual volume. Pull out a few wispy strands near the face to soften the look. This step-by-step process ensures thin hair maintains its structure while achieving a polished yet effortless handmade style. The combination of braiding and strategic pinning allows this easy project to deliver a full, creative, and aesthetic updo suitable for a variety of settings.

Idea 4: Knotted Top Knot
How to Create
The knotted top knot offers a contemporary, modern design for thin hair. By creating a knot at the crown of the head, it gives height and volume while keeping hair secure. This style is especially useful for creative projects, casual outings, or Pinterest-inspired DIY tutorials. The knot adds visual interest and serves as a statement element, while its minimalist structure ensures a beginner friendly execution. Accessories can be added to enhance aesthetic appeal or to complement home decor-themed photoshoots. The top knot is versatile, suitable for short to medium thin hair lengths, and can be adapted for both sleek and textured finishes.
To create the knotted top knot, start by gathering hair at the crown and securing it into a loose ponytail with an elastic. Divide the ponytail into two sections, twist them around each other, and form a knot. Secure the ends underneath with bobby pins, ensuring stability. Gently pull at the top of the knot to create a lifted effect, enhancing volume for thin hair. Lightly spray with texturizing mist to maintain hold. The execution process is simple yet effective, making this style ideal for DIY beginners who desire an easy project that achieves a bold handmade look with minimal preparation.

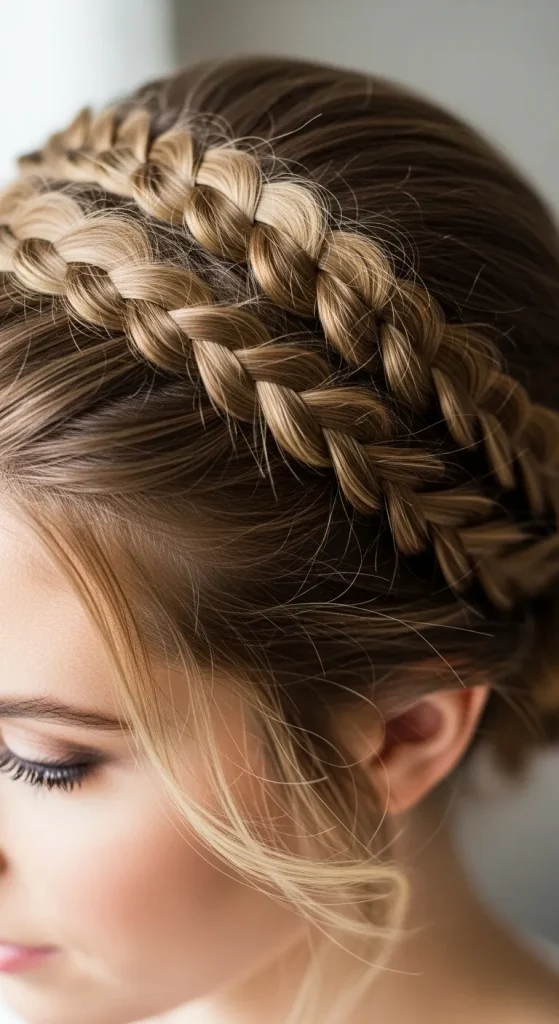
Idea 5: Braided Crown Updo
How to Create
The braided crown updo is an elegant style that wraps thin hair around the head to create the appearance of fullness and structure. This style draws inspiration from classic and modern aesthetics, making it suitable for both formal events and creative Pinterest projects. The braid adds a layered texture that enhances thin hair while maintaining a minimalist style. Incorporating the crown braid around the head emphasizes symmetry and elegance, making this hairstyle an excellent choice for handmade DIY inspiration and aesthetic presentation.
Begin by parting hair along the front and creating a braid from one temple toward the opposite ear. Continue braiding along the hairline, securing the braid with bobby pins. Repeat on the other side if necessary, combining braids at the back and tucking ends neatly. Slightly loosen strands for softness and added volume. This step-by-step guide allows thin hair to appear thicker while maintaining a polished and structured finish. Planning each braid and pin placement ensures stability throughout the day, providing a beginner friendly creative project that highlights thin hair’s potential for visually impactful updos.
Idea 6: Low Twisted Chignon
How to Create
The low twisted chignon is a sophisticated updo suitable for thin hair seeking volume and texture. By twisting hair sections before securing them at the nape, this style achieves a handmade aesthetic without excessive product use. The chignon’s shape naturally creates the appearance of fullness, while the twists add a layered, modern design element. This style aligns with trending ideas on Pinterest for minimal effort yet visually appealing updos. It is practical for both casual and formal occasions and can be personalized with decorative pins or minimalist accessories to enhance its aesthetic.
To create a low twisted chignon, divide hair into two sections on either side of the head. Twist each section toward the center and secure with bobby pins at the nape. Tuck ends neatly under the twists to maintain a smooth finish. Pull strands lightly to create softness and volume, particularly for thin hair. Use a light texturizing spray to add grip and maintain hold. Following this step-by-step execution process ensures a polished result while keeping the style beginner friendly and manageable. The combination of twists and a chignon creates a structured yet aesthetic handmade hairstyle suitable for various creative projects.

Idea 7: Fishtail Side Bun
How to Create
A fishtail side bun combines braid texture with a side-swept bun, creating volume and elegance for thin hair. This style transforms ordinary thin hair into a structured, visually appealing updo. The fishtail braid adds dimension and interest, while the side placement provides a modern design aesthetic suitable for Pinterest inspiration, minimalist styling, or casual DIY projects. The style is beginner friendly, as the braid does not require perfect precision and the bun accommodates minor imperfections. This makes it an ideal easy project for those seeking aesthetic results without extensive preparation.
Start by gathering hair to one side and create a fishtail braid, loosening sections to enhance volume. Once the braid is complete, wrap it into a low side bun and secure with pins. Pull strands gently to soften edges and create a more natural, handmade appearance. Optional decorative pins can enhance the aesthetic while maintaining minimalist style. This step-by-step method ensures thin hair achieves a full, creative, and visually interesting look suitable for modern design projects. The combination of braiding and bun placement provides a practical solution for thin hair, enhancing both texture and volume.

Idea 8: Double Twisted Updo
How to Create
The double twisted updo is a creative, structured style that uses two twisted sections to add volume and dimension to thin hair. This style works for beginner friendly DIY tutorials and is frequently shared on Pinterest for its aesthetic appeal. The twists create height at the crown and provide a layered texture that gives the illusion of thicker hair. This hairstyle can be adapted to formal or casual events, making it a versatile creative project for home styling. Its minimalist approach emphasizes handmade elegance without extensive product use.
To create a double twisted updo, divide hair into two sections from temple to crown. Twist each section and pin them at the back of the head, ensuring even distribution of volume. Tuck the ends under the twists to secure a neat finish. Optional strands can be pulled to soften the face frame, enhancing the aesthetic and natural look. This step-by-step process provides a structured and beginner friendly approach to thin hair updos, ensuring stability, volume, and a polished handmade finish suitable for a range of occasions.

Idea 9: Rope Braid Ponytail
How to Create
The rope braid ponytail is a simple yet stylish option for thin hair. This design combines a twisted rope braid with a ponytail, adding texture and volume to an otherwise flat hairstyle. It is beginner friendly and requires minimal materials, making it a practical DIY tutorial for Pinterest users seeking aesthetic, handmade projects. The rope braid enhances the visual thickness of thin hair, while the ponytail maintains flexibility for everyday wear. This style can be adapted for both casual and formal settings, creating a versatile easy project suitable for multiple occasions.
Begin by securing hair into a high ponytail. Divide the ponytail into two sections, twist them individually, and then wrap together to form a rope braid. Secure the ends with an elastic and gently pull the braid’s edges to add volume. Optional texturizing spray can help maintain hold and enhance thickness appearance. This step-by-step method ensures thin hair gains dimension and fullness while keeping the style beginner friendly and practical. The rope braid ponytail offers a handmade, creative project suitable for modern design and trending Pinterest ideas.

Idea 10: Twisted Halo Updo
How to Create
The twisted halo updo wraps thin hair around the head in a circular design, creating a crown-like effect. This style emphasizes both volume and elegance, making thin hair appear fuller and structured. The halo twist is beginner friendly, requiring only basic tools such as pins and elastics, and aligns with Pinterest trending ideas for aesthetic, creative projects. Its handmade approach adds sophistication to modern minimalist styling. This updo works for formal events, DIY tutorials, and home styling projects, offering versatility and visual impact.
To create the twisted halo updo, section hair along the front and create two twists from the temples toward the back of the head. Join the twists and pin them securely at the center back. Continue around the head if necessary, tucking ends under twists for a seamless finish. Loosen strands slightly for softness and volume. Using lightweight texturizing spray improves grip and maintains the updo’s structure. This execution process ensures thin hair gains the appearance of thickness and volume while remaining beginner friendly and practical. The result is a polished, handmade style that blends elegance and creative aesthetic appeal.

Common Beginner Mistakes and How to Avoid Them
One of the most common mistakes when styling thin hair is using heavy products, which can weigh strands down and reduce volume. Thin hair benefits from lightweight texturizing sprays, mousses, or volumizing powders rather than heavy gels or creams. Another frequent error is over-tightening hair, which can create tension, breakage, and a flat appearance. Allowing slight looseness while pinning helps maintain natural volume and a handmade aesthetic. Additionally, beginners often neglect sectioning, which can lead to uneven updos and lack of structure. Proper sectioning ensures symmetry and easier execution.
Other mistakes include skipping preparation steps, such as brushing or applying texturizing products. Skipping preparation can result in messy, unstable hairstyles, especially in delicate thin hair. Using incorrect tools, such as overly thick elastics or harsh brushes, can damage strands and disrupt the final result. It is also common for beginners to overlook hairline and face-framing adjustments, which can affect the updo’s balance. By planning sections, applying the right products, and practicing gentle handling, beginners can avoid these pitfalls and achieve polished, aesthetic, and secure updos.
Practical Tips for Better Results
To achieve better results with thin hair updos, start by applying lightweight texturizing spray or mousse to add grip and volume. Teasing the crown section lightly can provide height without damaging strands. Always secure sections with bobby pins placed strategically to distribute weight evenly. Pulling strands gently at the end of styling adds softness and a natural finish. Practicing each hairstyle beforehand ensures smoother execution and reduces frustration. Using small elastics and pins in matching hair colors maintains a professional and polished handmade look.
Planning the hairstyle according to hair length is another practical tip. Shorter thin hair may benefit from incorporating braids or twists to enhance fullness, while longer hair allows for more elaborate buns or braided styles. Curling or waving sections before updo creation adds texture and makes the hair appear thicker. Time management is also crucial; allocate sufficient time for each step to avoid rushed mistakes. Following these practical measures guarantees that thin hair updos are not only visually appealing but also stable, beginner friendly, and suitable for both casual and formal occasions.
Styling, Presentation, or Organization Ideas
Styling thin hair updos can be enhanced through careful presentation and arrangement. Decorative pins, minimalist hairbands, or subtle clips can complement the hairstyle while maintaining a modern design aesthetic. When arranging hair, balancing volume across the crown, sides, and back ensures a uniform appearance. For Pinterest-inspired DIY tutorials, arranging strands in a slightly undone manner adds a natural, handmade aesthetic. Highlighting textures through curls, twists, or braids can create a more creative and layered visual effect.
Organizational planning also contributes to execution success. Preparing tools and materials beforehand, dividing hair into clear sections, and planning pin placement improve efficiency and reduce mistakes. Accessories should be considered from the start to ensure they integrate seamlessly with the updo. For multiple updos in a sequence, consistency in sectioning and styling technique enhances visual cohesion. This approach allows thin hair to achieve full, aesthetic, and polished results, transforming simple DIY projects into creative, visually engaging hairstyles suitable for modern Pinterest inspiration.
Budget or Time Planning
Completing thin hair updos efficiently requires both time and budget planning. Most updos rely on minimal materials, making them a budget-friendly creative project. Essentials such as bobby pins, elastics, brushes, and optional texturizing spray are affordable and reusable across multiple hairstyles. Planning the use of decorative elements ensures cost efficiency while maintaining a stylish appearance. Allocating a small area with all materials accessible reduces disruption and supports smoother execution.
Time planning is equally critical for achieving polished results. Beginners should allow extra time for preparation, such as sectioning and teasing, as well as for practicing the steps before the final execution. Each updo may take 10–30 minutes depending on complexity and experience. Dividing the process into stages—preparation, sectioning, pinning, and finishing—can improve efficiency. This structured approach allows DIY enthusiasts to complete creative projects within realistic time frames while ensuring aesthetic and functional outcomes. Budget-conscious planning combined with organized time allocation ensures a manageable and enjoyable process for any beginner creating thin hair updos.
Creative Expansion and Advanced Inspiration
Once basic updos for thin hair are mastered, creative expansion allows for more intricate and personalized designs. Combining elements such as multiple braids, twists, and bun variations can