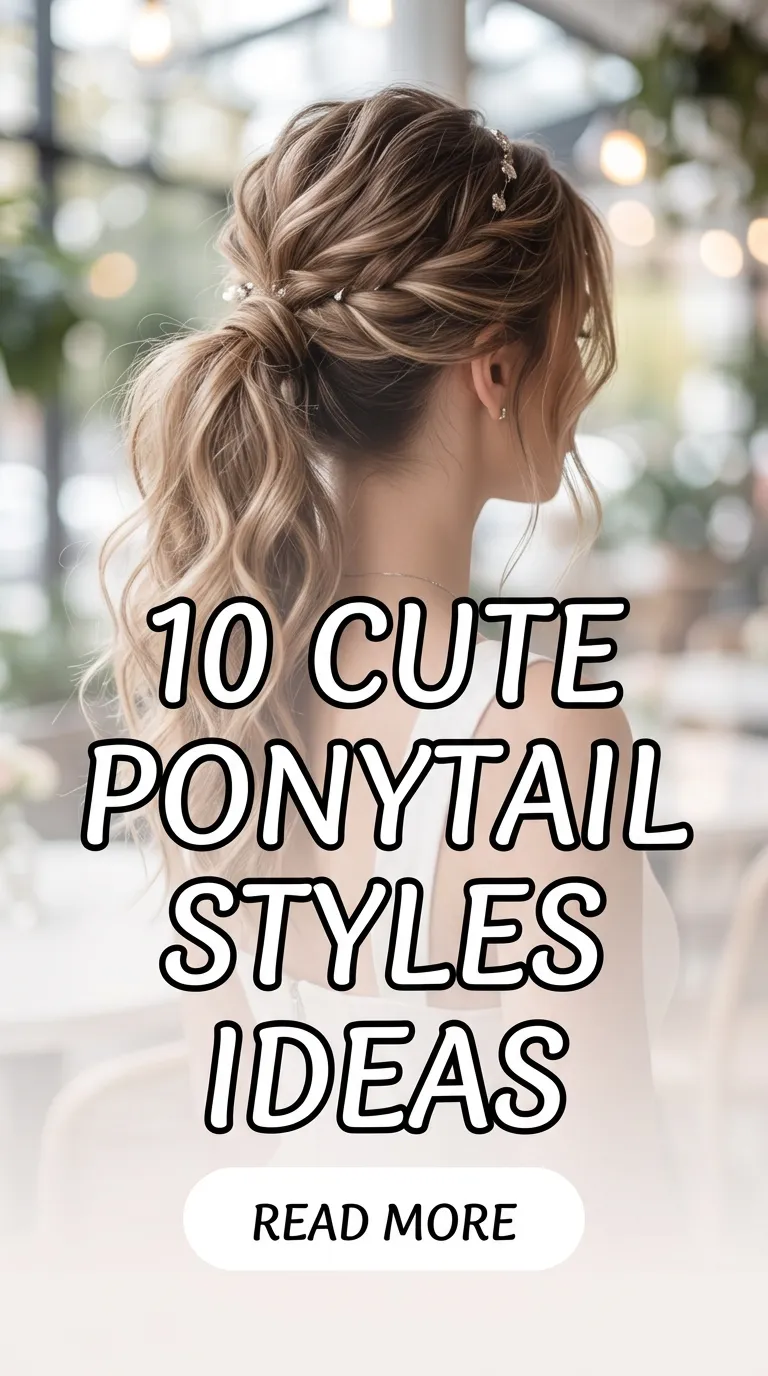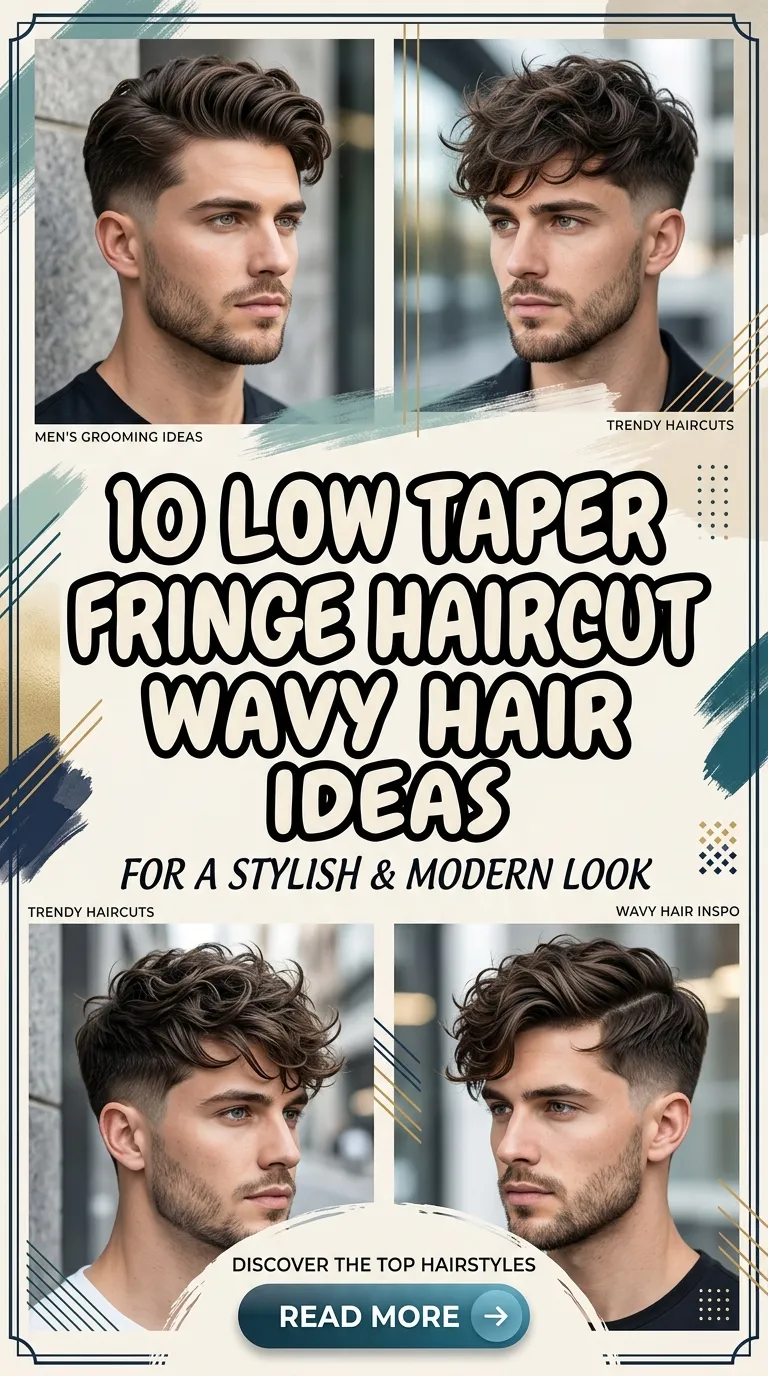
10 Low Taper Fringe Haircut Wavy Hair Ideas

Introduction
Low taper fringe haircut ideas for wavy hair combine natural texture with structured cutting techniques to create a balanced and modern hairstyle. This haircut features a gradual taper along the sides and back while maintaining a longer fringe that enhances the natural wave pattern. It is widely shared in Pinterest ideas because it offers both control and flexibility, allowing waves to remain visible without creating excess volume. This article explains how to create and maintain different variations of this haircut using clear, step by step methods. Readers will learn how to work with natural wave patterns, control taper blending, and shape the fringe for consistent results. These creative ideas are beginner friendly and practical for both home styling and professional grooming. The style supports a clean and organized appearance while preserving the texture that defines wavy hair. With proper planning and technique, this haircut provides a reliable and adaptable solution for everyday styling.
Why This Idea Is Trending or Useful
Low taper fringe haircuts for wavy hair are trending because they align with modern design preferences that emphasize natural texture and clean structure. This hairstyle offers practical value by maintaining the wave pattern while keeping the sides neat and controlled. The low taper creates a gradual transition that blends smoothly into the top, reducing bulk without removing texture. The fringe allows the waves to frame the face, adding dimension and movement. Pinterest inspiration frequently highlights this style because it balances natural flow with defined edges. The DIY appeal is strong, as the haircut can be maintained with basic tools and simple techniques. These creative ideas are accessible for beginners when broken into structured steps. The ability to adapt the fringe length and taper depth makes this style suitable for different hair densities and wave types. This combination of practicality, flexibility, and aesthetic clarity contributes to its growing popularity.
Materials and Preparation
Preparing for a low taper fringe haircut on wavy hair requires careful planning to maintain the natural texture. Begin with clean, dry hair to observe the natural wave pattern clearly. Common materials include clippers with adjustable guards, scissors, a comb, and a mirror. A spray bottle can be used to lightly dampen sections if needed. Sectioning is essential to separate the top from the sides and maintain control during cutting. Planning should include determining the desired fringe length and the depth of the taper. The taper should start low near the ear and blend gradually into the longer top section. It is important to follow the natural direction of the waves when cutting to avoid disrupting their pattern. Proper lighting ensures accurate cutting and blending. After shaping, light styling products can be used to enhance the waves. This preparation ensures that the haircut remains structured while preserving natural movement.
Idea 1: Natural Wavy Fringe with Classic Low Taper
How to Create
A natural wavy fringe with a classic low taper focuses on maintaining the original wave pattern while creating a clean and structured outline. The taper is applied gradually along the sides and back, ensuring a smooth transition into the longer top section. The fringe is left slightly longer to allow the waves to form naturally across the forehead. This design emphasizes balance by combining controlled edges with soft movement. The natural waves create texture without requiring excessive styling, making this approach practical for daily wear. This style aligns with modern minimalist design by maintaining simplicity while highlighting natural features. The combination of a subtle taper and a defined yet relaxed fringe creates a cohesive appearance that supports both structure and flexibility.
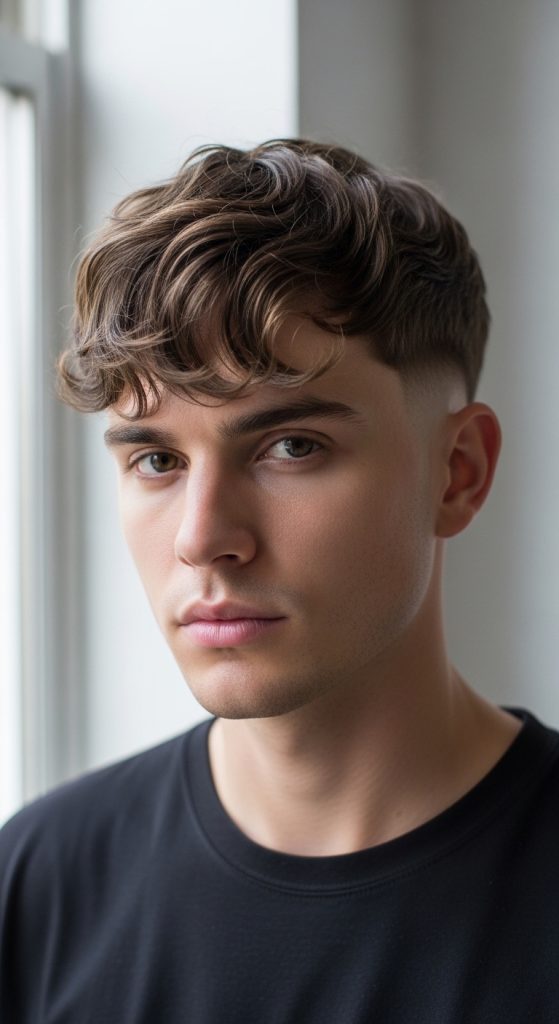
To achieve this style, begin by tapering the sides using clippers and blending carefully into the top. Use scissors to trim the fringe while following the natural wave pattern. Avoid cutting too short, as this can disrupt the waves. Allow the fringe to fall naturally and adjust for balance. Apply a light styling product to enhance definition without weighing down the hair. This step by step process ensures a consistent and natural result.
Idea 2: Textured Wavy Fringe with Soft Low Taper
Step-by-Step Guide

A textured wavy fringe with a soft low taper introduces additional depth and variation while preserving natural movement. The taper is subtle and blends smoothly into the top, maintaining a clean outline without sharp contrast. The fringe is shaped with slight variation to enhance the natural texture of the waves. This design supports a relaxed appearance while maintaining structure. The textured fringe adds dimension and prevents the hair from appearing flat, making it suitable for medium-density wavy hair. This approach balances natural flow with controlled edges, aligning with modern styling preferences.
To create this look, use clippers to establish a low taper and blend it evenly. Use scissors to cut the fringe in small sections, following the wave pattern. Avoid straight cuts to maintain texture. Allow the hair to settle naturally and adjust for symmetry. Apply a light product to define the waves. This tutorial provides a beginner friendly method.
Idea 3: Side-Swept Wavy Fringe with Low Taper
How to Make
A side-swept wavy fringe introduces direction and asymmetry while maintaining natural texture. The low taper keeps the sides clean and structured.

To achieve this style, taper the sides and leave the fringe slightly longer. Guide the waves to one side using a comb. This method creates a dynamic and balanced appearance.
Idea 4: Layered Wavy Fringe with Defined Taper
How to Create
Layered wavy fringe adds depth and dimension. The defined taper enhances clarity and structure.

To create this style, layer the top section using scissors and taper the sides carefully. Allow the waves to form naturally and adjust for balance.
Idea 5: Curved Wavy Fringe with Natural Taper
Execution Process
A curved fringe softens the overall look while maintaining wave definition. The natural taper blends smoothly into the top.

To achieve this, shape the fringe in a gentle curve and taper the sides gradually. Style lightly to preserve texture.
Idea 6: Short Wavy Fringe with Minimal Low Taper
How to Make

A short wavy fringe creates a compact and clean style. The minimal taper maintains a subtle transition.
To create this look, trim the fringe carefully while preserving wave structure. Taper the sides lightly for a neat finish.
Idea 7: Voluminous Wavy Fringe with Blended Taper
Setup Method
A voluminous wavy fringe adds height and fullness. The blended taper ensures smooth transitions.

To achieve this style, leave the top longer and taper the sides gradually. Style the fringe to enhance natural lift.
Idea 8: Messy Wavy Fringe with Low Taper
How to Create
A messy wavy fringe introduces relaxed texture while maintaining a structured base. The low taper keeps the outline clean.

To create this style, cut the fringe with slight variation and taper the sides. Allow the waves to fall naturally for a casual look.
Idea 9: Long Wavy Fringe with Subtle Taper
Step-by-Step Guide

A long wavy fringe provides extended coverage and flexibility. The subtle taper maintains balance.
To achieve this, keep the fringe longer and taper the sides gently. Adjust the waves for even distribution.
Idea 10: Sleek Wavy Fringe with Polished Low Taper
How to Create
A sleek wavy fringe focuses on controlled waves and smooth structure. The polished taper supports a refined appearance.

To achieve this style, shape the fringe carefully and taper the sides evenly. Use a light product to control the waves while maintaining movement.
Common Beginner Mistakes and How to Avoid Them
A common mistake is cutting wavy hair too short, which disrupts the natural pattern and reduces flexibility. Another issue is creating uneven taper transitions, resulting in visible lines. Beginners often ignore the direction of the waves, leading to inconsistent results. Overusing styling products can weigh down the hair and reduce movement. To avoid these problems, always follow the natural wave pattern and cut gradually. Blend the taper carefully and check alignment frequently. Use minimal product to maintain texture. This approach ensures a balanced and natural finish.
Practical Tips for Better Results
For better results, work with the natural wave pattern rather than against it. Use proper sectioning to maintain control and ensure even cutting. Apply light styling products to enhance definition without stiffness. Regular trims help maintain structure and prevent uneven growth.
Styling, Presentation, or Organization Ideas
Organize tools and sections before starting to improve efficiency. Use clips to separate areas and maintain a structured workflow. Keep the fringe aligned with the overall design. This approach supports a clean and polished presentation.
Budget or Time Planning
Plan the haircut in stages to manage time effectively. Use basic tools and avoid unnecessary purchases. Focus on essential steps such as tapering and shaping the fringe. This ensures efficient execution.
Creative Expansion and Advanced Inspiration
Advanced variations can include combining taper styles with different wave lengths and textures. Experiment with fringe direction and volume to create unique looks. These creative ideas allow customization while maintaining structure and natural movement.
Introduction
Low taper fringe haircut ideas for wavy hair combine natural texture with structured cutting techniques to create a balanced and modern hairstyle. This haircut features a gradual taper along the sides and back while maintaining a longer fringe that enhances the natural wave pattern. It is widely shared in Pinterest ideas because it offers both control and flexibility, allowing waves to remain visible without creating excess volume. This article explains how to create and maintain different variations of this haircut using clear, step by step methods. Readers will learn how to work with natural wave patterns, control taper blending, and shape the fringe for consistent results. These creative ideas are beginner friendly and practical for both home styling and professional grooming. The style supports a clean and organized appearance while preserving the texture that defines wavy hair. With proper planning and technique, this haircut provides a reliable and adaptable solution for everyday styling.
Why This Idea Is Trending or Useful
Low taper fringe haircuts for wavy hair are trending because they align with modern design preferences that emphasize natural texture and clean structure. This hairstyle offers practical value by maintaining the wave pattern while keeping the sides neat and controlled. The low taper creates a gradual transition that blends smoothly into the top, reducing bulk without removing texture. The fringe allows the waves to frame the face, adding dimension and movement. Pinterest inspiration frequently highlights this style because it balances natural flow with defined edges. The DIY appeal is strong, as the haircut can be maintained with basic tools and simple techniques. These creative ideas are accessible for beginners when broken into structured steps. The ability to adapt the fringe length and taper depth makes this style suitable for different hair densities and wave types. This combination of practicality, flexibility, and aesthetic clarity contributes to its growing popularity.
Materials and Preparation
Preparing for a low taper fringe haircut on wavy hair requires careful planning to maintain the natural texture. Begin with clean, dry hair to observe the natural wave pattern clearly. Common materials include clippers with adjustable guards, scissors, a comb, and a mirror. A spray bottle can be used to lightly dampen sections if needed. Sectioning is essential to separate the top from the sides and maintain control during cutting. Planning should include determining the desired fringe length and the depth of the taper. The taper should start low near the ear and blend gradually into the longer top section. It is important to follow the natural direction of the waves when cutting to avoid disrupting their pattern. Proper lighting ensures accurate cutting and blending. After shaping, light styling products can be used to enhance the waves. This preparation ensures that the haircut remains structured while preserving natural movement.
Idea 1: Natural Wavy Fringe with Classic Low Taper
How to Create
A natural wavy fringe with a classic low taper focuses on maintaining the original wave pattern while creating a clean and structured outline. The taper is applied gradually along the sides and back, ensuring a smooth transition into the longer top section. The fringe is left slightly longer to allow the waves to form naturally across the forehead. This design emphasizes balance by combining controlled edges with soft movement. The natural waves create texture without requiring excessive styling, making this approach practical for daily wear. This style aligns with modern minimalist design by maintaining simplicity while highlighting natural features. The combination of a subtle taper and a defined yet relaxed fringe creates a cohesive appearance that supports both structure and flexibility.
To achieve this style, begin by tapering the sides using clippers and blending carefully into the top. Use scissors to trim the fringe while following the natural wave pattern. Avoid cutting too short, as this can disrupt the waves. Allow the fringe to fall naturally and adjust for balance. Apply a light styling product to enhance definition without weighing down the hair. This step by step process ensures a consistent and natural result.
Idea 2: Textured Wavy Fringe with Soft Low Taper
Step-by-Step Guide
A textured wavy fringe with a soft low taper introduces additional depth and variation while preserving natural movement. The taper is subtle and blends smoothly into the top, maintaining a clean outline without sharp contrast. The fringe is shaped with slight variation to enhance the natural texture of the waves. This design supports a relaxed appearance while maintaining structure. The textured fringe adds dimension and prevents the hair from appearing flat, making it suitable for medium-density wavy hair. This approach balances natural flow with controlled edges, aligning with modern styling preferences.
To create this look, use clippers to establish a low taper and blend it evenly. Use scissors to cut the fringe in small sections, following the wave pattern. Avoid straight cuts to maintain texture. Allow the hair to settle naturally and adjust for symmetry. Apply a light product to define the waves. This tutorial provides a beginner friendly method.
Idea 3: Side-Swept Wavy Fringe with Low Taper
How to Make
A side-swept wavy fringe introduces direction and asymmetry while maintaining natural texture. The low taper keeps the sides clean and structured.
To achieve this style, taper the sides and leave the fringe slightly longer. Guide the waves to one side using a comb. This method creates a dynamic and balanced appearance.
Idea 4: Layered Wavy Fringe with Defined Taper
How to Create
Layered wavy fringe adds depth and dimension. The defined taper enhances clarity and structure.
To create this style, layer the top section using scissors and taper the sides carefully. Allow the waves to form naturally and adjust for balance.
Idea 5: Curved Wavy Fringe with Natural Taper
Execution Process
A curved fringe softens the overall look while maintaining wave definition. The natural taper blends smoothly into the top.
To achieve this, shape the fringe in a gentle curve and taper the sides gradually. Style lightly to preserve texture.
Idea 6: Short Wavy Fringe with Minimal Low Taper
How to Make
A short wavy fringe creates a compact and clean style. The minimal taper maintains a subtle transition.
To create this look, trim the fringe carefully while preserving wave structure. Taper the sides lightly for a neat finish.
Idea 7: Voluminous Wavy Fringe with Blended Taper
Setup Method
A voluminous wavy fringe adds height and fullness. The blended taper ensures smooth transitions.
To achieve this style, leave the top longer and taper the sides gradually. Style the fringe to enhance natural lift.
Idea 8: Messy Wavy Fringe with Low Taper
How to Create
A messy wavy fringe introduces relaxed texture while maintaining a structured base. The low taper keeps the outline clean.
To create this style, cut the fringe with slight variation and taper the sides. Allow the waves to fall naturally for a casual look.
Idea 9: Long Wavy Fringe with Subtle Taper
Step-by-Step Guide
A long wavy fringe provides extended coverage and flexibility. The subtle taper maintains balance.
To achieve this, keep the fringe longer and taper the sides gently. Adjust the waves for even distribution.
Idea 10: Sleek Wavy Fringe with Polished Low Taper
How to Create
A sleek wavy fringe focuses on controlled waves and smooth structure. The polished taper supports a refined appearance.
To achieve this style, shape the fringe carefully and taper the sides evenly. Use a light product to control the waves while maintaining movement.
Common Beginner Mistakes and How to Avoid Them
A common mistake is cutting wavy hair too short, which disrupts the natural pattern and reduces flexibility. Another issue is creating uneven taper transitions, resulting in visible lines. Beginners often ignore the direction of the waves, leading to inconsistent results. Overusing styling products can weigh down the hair and reduce movement. To avoid these problems, always follow the natural wave pattern and cut gradually. Blend the taper carefully and check alignment frequently. Use minimal product to maintain texture. This approach ensures a balanced and natural finish.
Practical Tips for Better Results
For better results, work with the natural wave pattern rather than against it. Use proper sectioning to maintain control and ensure even cutting. Apply light styling products to enhance definition without stiffness. Regular trims help maintain structure and prevent uneven growth.
Styling, Presentation, or Organization Ideas
Organize tools and sections before starting to improve efficiency. Use clips to separate areas and maintain a structured workflow. Keep the fringe aligned with the overall design. This approach supports a clean and polished presentation.
Budget or Time Planning
Plan the haircut in stages to manage time effectively. Use basic tools and avoid unnecessary purchases. Focus on essential steps such as tapering and shaping the fringe. This ensures efficient execution.
Creative Expansion and Advanced Inspiration
Advanced variations can include combining taper styles with different wave lengths and textures. Experiment with fringe direction and volume to create unique looks. These creative ideas allow customization while maintaining structure and natural movement.